
This video I found pretty much tells the story and got me up and running but I wanted a document to store my learnings for future reference. Below are the steps, and I wanted to use a more enjoyable minimal window manager (Xfce) than Gnome (Gnome is pretty odd to work with for the uninitiated where Xfce is intuitive, especially for MacOS users). See the below side-by-side comparison and judge for yourself.
Note: If you find the below pictures difficult to read, selecting them will bring them into full size view.
Create and Provision your EC2 Instance
Go into AWS and create an Ubuntu 18 (or even newer). Older versions of Ubuntu are tricky to get working with a desktop manager (at least 14 had a lot of threads generated in forums of people trying to get this to work).GUI Software Stack
These are the parts we need: VNC, a window manager, and a desktop manager.There's another piece called a Display Manager which handles user login, but as we aren't exporting X11 directly, we don't need this. VNC will handle our password, which means the security is reduced somewhat (the hacker only needs to get one thing correct rather than two (username & password). But for my purpose of creating temporary dev environments, it's good enough.
So SSH into your instance and install the below:
$ssh -i path_to_your_pub_priv_keyubuntu@some_ip_address
$sudo apt install vnc4server
$sudo apt install xfce4
$sudo apt install xfce4-terminalWhat these are: vnc4server is how we'll connect from our Mac to the remote linux instance. xfce4 will bring a window manager and a set of default applications (web browser, LibreOffice,...). xfce-terminal will give us a terminal that will work with our wind-manager.
To make your ubuntu desktop happy create the following directories:
- mkdir $HOME/Desktop
$ vncserverKill the server for now:
$ vncserver -kill :1The world of VNC is a little different than the world of X11 (if you are familiar with that). A "xstartup" file is executed by the VNC server to get the windowing and desktop setup for the user who logs into the VNC. Go into $HOME/.vnc, and replace what's in xstartup with the following:
#!/bin/bashThese commands do the following:
xrdb $HOME/.Xresources
startxfce4 &
vncconfig -nowin &
- xrdb : give X a location to store property settings.
- startxfce4 : starts the xfce session
- vncconfig : adds copy/paste support. I found it's solid going from VNC session to host, in my setup going from host to VNC session, I had to "slow down" and hold down the copy-paste button a bit longer or it wouldn't take.
Tidy up things by doing the following:
$chmod 755 xstartuprestart VNC:
$touch $HOME/.Xresources
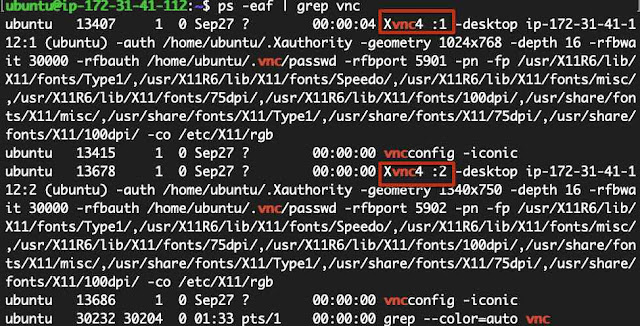
$ vncserverDo "ps -eaf | grep vnc" to see what display port you will be using (it's usually ":1"):

In the above, I've opened two display ports, ":1" and ":2". If you ssh again and run vncserver for that session, it'll allocate get the next free display port. More about display ports mapping to network servers will be covered later in this document but this general idea is enough to get you going.
Do a "ps -eaf | grep xfce" and you'll see that upon startup, the server executed your user's xstartup.
If you reboot the EC2 instance, your VNC server will stop. If you want VNC to always be active, you'll need to setup a "service." There is a link with instructions at the end of this article.
Connecting to your Instance
You can't yet connect directly to your instance as it's walled behind a virtual private cloud that is, by default, refusing all connections. Two typical ways to get to your server are using SSH to create a tunnel to your server, which is great for ec2 instances you really don't want to allow connections from outside their virtual private cloud (VPC). The other way is to change the security group so the VPC allows inbound connections so that you can frequently and conveniently connect to it with minimal fuss.A big problem with X11 is that it doesn't communicate using a secure channel unless you use the SSH tunnel. So bear in mind that unless you're using an SSH tunnel, all those words your passing back and forth with your X client will be traveling un-encoded. It's not clear to me that VNC4Server makes things any more secure.
Using an SSH Tunnel
Remember the display port discovered by running "ps -eaf | grep vnc"? If it's a one, then that maps to network port 5901. A display port of 2 will map to network port 5902, and so on.
Then launch MacOS's Screen Sharing app (go to spotlight and enter "screen sharing"), enter in "localhost:5902" which is your side of the SSH tunnel.


Adjusting the Security Group to allow Direct Connect
If you aren't operating with sensitive information and don't want too be hassled by creating a SSH tunnel every time you want to connect to this instance, then changing the VPC security group thusly will give you access to your EC2 instance.
Refer to your instance's meta-information to get it's security group:
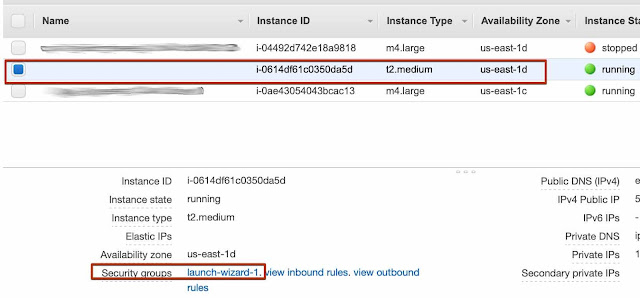 Then open the security group and add an inbound rule:

Remember, when changing your security groups and if you plan to keep the VNC running all the time, you'll only be protected by a password, not even a username and password. You'll really be much safer from attack if you adjust the inbound rule to accept the source of only a specific IP or set of IPs rather than 0.0.0.0/0 which means from any IP address on the internet.
Refer to your instance's meta-information to get it's security group:


More about Display Ports mapping to Network Ports
VNC servers typically use the range of 5800 to 5899 or 5900 to 5999, depending on configuration. The server will use port 5800 (or 5900) for internal reasons and any new displays added will be incremented from 5800 or 5900. VNC4 uses 5900 and so the first time I launch VNC and left it running, it got display 1 (5901). The next connection I created with my SSH tunnel (if you did that) got display 2, or port 5902. You can see what displays/ports are being used by inspecting your system with the "ps" command.Remember, when changing your security groups and if you plan to keep the VNC running all the time, you'll only be protected by a password, not even a username and password. You'll really be much safer from attack if you adjust the inbound rule to accept the source of only a specific IP or set of IPs rather than 0.0.0.0/0 which means from any IP address on the internet.
For Further Study
To learn more about VNC configuration: https://www.stuartellis.name/articles/vnc-on-linux/#understanding-vnc
Create a .vncrc to preset screen geometry (resolution) and .... : https://stackoverflow.com/questions/26489895/how-do-i-change-the-vncserver-default-geometry
Create a .vncrc to preset screen geometry (resolution) and .... : https://stackoverflow.com/questions/26489895/how-do-i-change-the-vncserver-default-geometry
To make the VNC server run as a service: https://www.binarytides.com/remote-ubuntu-desktop-via-vnc/
