Monday, April 13, 2020

Splitting a Cell in Excel


I confess to be a Mac fanboy but sometimes I need to work with people who use Excel rather than Numbers. One problem that took twenty minutes of searching to figure out (but is easy to do with Apple's Numbers spreadsheet) is how to split a cell into two pieces.

After watching YouTube and reading comments from others who remained confused, it finally hit me: Excel ONLY provides "merge cell." And you don't technically need "split cell" because you can split cells already with "insert row." So the idea is to insert a row and then merge the parts that you don't want split.

Here are the steps: Insert a row, merge cells that shouldn't be split, done!

Example

Here is an example.  I want to split the cells to the right of the headers that label the days of the week.

Insert Row

Since insert row inserts above the selected row, you need to select the row beneath your target.  So to do Monday, I had to select the row beneath Monday.

Merge other Cells

Select the Monday cell and the cell beneath, then click on "Merge & Center" and then "Merge Cells."

Wrap-up 

So Excel doesn't believe in cell division, only cell fusion. :-) And I'll have to either repeat the process more times for each day of the week or copy paste the formatting. If you want to do something different such as split cells vertically, then follow the same process but insert a column rather than a row.

Saturday, April 11, 2020

Games for the Virtual Office

Games you can play with colleagues at the virtual office.

The Agile Thoughts podcast will produce an episode on games for the virtual office. Please share your favorites and I'll put them in the episode. You can share by either Tweeting to @LancerKind, commenting on this post, or adding to this Hacker News thread.

Click here for Agile Thoughts. 

Tuesday, March 10, 2020

USB 3.0/3.1 ruins Wi-Fi connectivity

Have you ever had a webcast or video conference to attend and then the very moment you need your internet to work smoothly, it performs like elves are hanging tinfoil ornaments on your Wifi router? Perhaps you, like me, are hooking in keyboards and docking stations via the USB ports, and doing so could be ruining your internet connectivity!  And not by a little, but a LOT.

USB 3.0/3.1 Hubs

Honestly, USB 3.0 hubs should come giant warning labels.  Many USB devices you've been buying have some fine print that mentions "may reduce performance of Wifi."  For the last decade (since the time I got my first USB 3.0 hub) I've been having strange wifi performance which then causes phone calls to my network provider.  So for years I've been barking at the wrong people, because it turns out, USB 3.0/3.1 hubs cause interference that interfere with 2.4 GHZ wifi!

Let me break it down for you with a Behavior Driven Development scenario:
Given laptop And usb 3.0 hub
When using Wifi over 2.4GHZ
Then internet performance is greatly reduced (reduction by 20% - 100%)

Check out these before and after photos done on a late 2019 Mac Book Pro and pay attention to the speed difference from when the blue cable is plugged in and when it is not (the cable leads to my 3.0 USB hub which sits about a foot away from my laptop):
USB 3.0 hub disconnected
USB hub connected
I've replicated the problem every other laptop I've in the house and the problem is completely reproducible.  The amount of reduction varies between 20%-100% (100% mean no data moves from or to the laptop).  USB 3.0/3.1 devices work fine when directly connected to my laptop. The problem happens when a hub is added.

Solution: Turn off the 2.4GHZ channel on your Wifi

Most people have their WIFI access points sending BOTH 2.4GHZ and 5GHZ. 2.4GHZ Wifi has a longer range at a slower maximum speed.  5GHZ Wifi has over double the speed but degrades over range faster than 2.4GHZ.  This means that most people who buy Wifi routers, let the routers use both channels (2.4 and 5 GHZ) in which case their laptop will shift between the two channels as needed.

But this is a bad idea when using 3.0 or 3.1 USB devices.

Configuring your Wifi router to turn off the 2.4GHZ radio solves the problem with the laptop.  But if you're like me, you've a few things like printers, Xbox 360, or home automation that only connect on 2.4ghz.  So now what?

Solution 2: Differentiation 2.4 and 5 GHZ with different SIDs

Go back to your Wifi router and rename the SSID for the 2.4 GHZ channel to ... 2.4, and don't tell your laptop about that other SSID.  Then you're laptop stays off of 2.4GHZ and your older devices can use the 2.4GHZ channel.

Solution 3: Use a Wired Internet Connection

I've not tested this, but I expect that a hardwire connection into the laptop will solve the problem whether or not a hub is plugged in, as long as your laptop doesn't suddenly decide to grab Wifi.

Thursday, December 19, 2019

TDD and mocking a Google Application Script with GAST


What is TDD

Motivation for writing this: teach the TDD workflow with GAST.  

Why do TDD?  Expected outcomes. Reference GAST.  Mention other tools.  W

TDD Workflow

Look at the code or do some white boarding/thinking about what code change you want to make. Once you identify your opening move--change existing code or create something brand new, start the TDD flow.

Tutorial

Step 0, Setup GAS Project

Step 1, Define the next simplest step in functionality

Describe what is meant by simplest.  And not necessarily complete.  Just a step.


Step 2, Work on Test until it has a fully functioning FAILURE

The test should and what it's testing should compile but not comprise of the product code yet.  Said another way, the test should be completely formed (meaning no errors or exceptions occurring in the test code) and successfully calling your product code (which is simply a stub at the beginning).

Step 3, Add functionality to get the test to PASS

Step 4, Refactor

Step 5, Go Back to Step 1 or Check in if Finished

By the way: learn more about TDD and micro testing

Check out the Agile Thoughts podcast.  This podcast gets the Confessions Of An Agile Coach's endorsement (naturally, since the same people produce it) of quality materials for developers and teams trying to get coding done in a way that avoids dealing with legacy issues such as bugs and hard to maintain code.  Agile Thoughts has a lot of great TDD conceptual content along with a radio drama about the difficulties to getting a TDD initiative started.  Click the podcast cover below or here for more information.

Agile Thoughts podcast

Wednesday, December 18, 2019

Creating a Coding Story (Coding Stories) with STS or Eclipse

CodingStories.io is a wonderful tool for senior developers to spread the knowledge of craftsmanship through an organization. Here is a good tool chain for doing this with STS/Eclipse:
  • Maven
  • JUnit 5
  • Git
Why Maven? Unless you want to assume all your Coding Stories readers will be using your IDE of choice (or let them work out setting up the dependencies), use Maven to abstract away your IDE for dependency management.
Why JUnit5? Because it's the most modern and is now well integrated into IDEs.
Why Git? Because that's what Coding Stories uses for integration.

Maven

Using STS's wizard, build a Maven project.


The below seems to be the simplest POM type.


Run the maven build and at should successfully build the Maven HelloWorld application.  (See troubleshooting if not.)

Rename the "project" folder per Coding Stories convention.  (I needed to add "-java" onto the end.) Later, this will be our Git repository.


The next section describes how to adjust the POM file and IDE to handle JUnit 5.

JUnit 5

Although IDEs have JUnit 5 integration, many of them default to JUnit 4. The following POM describes how to use JUnit 5 in your Maven project:

<project xmlns="http://maven.apache.org/POM/4.0.0"
 xmlns:xsi="http://www.w3.org/2001/XMLSchema-instance"
 xsi:schemaLocation="http://maven.apache.org/POM/4.0.0 http://maven.apache.org/maven-v4_0_0.xsd">

 <modelVersion>4.0.0</modelVersion>
 <groupId>biz.agilenoir</groupId>
 <artifactId>helloworldmocking</artifactId>

 <packaging>jar</packaging>
 <version>0.0.1-SNAPSHOT</version>
 <name>TDD going from Hello World to Mocking</name>
 <url>http://AgileNoir.biz</url>

 <dependencies>
  <!--JUnit tests depend on the engine artifact to build-->
  <dependency>
   <groupId>org.junit.jupiter</groupId>
   <artifactId>junit-jupiter-engine</artifactId>
   <version>5.5.2</version>
   <scope>test</scope>
  </dependency>
 </dependencies>

 <build>
  <plugins>
   <plugin>
    <groupId>org.apache.maven.plugins</groupId>
    <artifactId>maven-compiler-plugin</artifactId>
    <version>3.8.1</version>
    <!-- Maven by default doesn't support Java 13 so the below sets that up -->
    <configuration>
     <source>13</source>
     <target>13</target>
    </configuration>
   </plugin>
   <plugin>
   <artifactId>maven-surefire-plugin</artifactId>
   <version>2.22.2</version>
   </plugin>
  </plugins>
 </build>

</project>


What this does:

  • POM boiler plate: The first paragraph tells XML parsers about the schema to use for validation and declares the namespace.
  • project identity: your project information here
  • package the build as a Jar (required to package it into something)
  • dependencies: JUnit Jupiter is declared here
  • build/plugins: 
    • Maven plugin: 
      • Since I'm building with Java 13, I declare a modern version of the maven plugin to be used when building, 3.8.1 (you see, maven itself is a plugin).  The default maven plugin doesn't support newer versions of Java.
      • Configure the maven plugin to use Java 13
    • Surefire plugin: used to execute unit tests.
Configure the IDE's project to use JUnit 5:

 Add a simple JUnit 5 test to test the configuration and run it from Eclipse.


package biz.agilenoir.helloworldmocking;
import static org.junit.jupiter.api.Assertions.*;
import org.junit.jupiter.api.Test;
class HelloWorldTest {
@Test
void test() {
fail("Not yet implemented");
}
}
 Run the test and observe that it fails.


Run the test from Maven.  Watch the console for the test report.


If you want to see the test pass, make a change, then run the unit test.  All that's left is to configure Git for CodingStories.

By the way: regarding TDD

Check out the Agile Thoughts podcast.  This podcast gets the Confessions Of An Agile Coach's endorsement (naturally, since the same people produce it) of quality materials for developers and teams trying to get coding done in a way that avoids dealing with legacy issues such as bugs and hard to maintain code.  Agile Thoughts has a lot of great TDD conceptual content along with a radio drama about the difficulties to getting a TDD initiative started.  Click the podcast cover below or here for more information.


Configure Git

Using STS, create a Git repository inside your workspace (there is some controversy over whether this is the best use of Git, but as there is controversy and "no one right way" I think it's alright in this case.)


The project now has "badges" for M-maven, J-java, and a little gold storage icon for Git.

Write your Coding Story

Now that your environment is all tested out. It's time to build your coding story.  Follow "how to" at CodingStories to create your story. When you're finished, tell all your software developer friends and co-workers all about it.  Send them links.  Brag to your boss.  You know, socialize your tools to help others.

 XXX Link to my own coding story coming soon to here XXX

Tweet me if you get stuck: @LancerKind

References

https://howtodoinjava.com/junit5/junit5-maven-dependency/
https://maven.apache.org/plugins/maven-compiler-plugin/examples/set-compiler-source-and-target.html

Troubleshooting

Problem: Maven build gives me the following:

[ERROR] Source option 5 is no longer supported. Use 7 or later.
[ERROR] Target option 5 is no longer supported. Use 7 or later.
[INFO] 2 errors 
[INFO] -------------------------------------------------------------
[INFO] ------------------------------------------------------------------------
[INFO] BUILD FAILURE

Solution:  Maven defaults to Java 1.6 and will default to a version of the maven plugin that won't work with java 9 or higher unless changes are made in "configuration" (https://maven.apache.org/guides/getting-started/maven-in-five-minutes.html).


 Problem: Can't execute unit test in STS


Solution: Click "OK" and setup a run configuration for JUnit 5.


Problem: "$ mvn test" (Maven) doesn't execute find my unit tests.

Solution: Use the Surfire plugin.  See it as the second plugin declared below.


Friday, December 13, 2019

Getting the JDK version correct in STS4 / Eclipse2019 on MacOs

After installing the latest STS (version 4 and built on Eclipse 2019) and JDK13, I made a new project and had some difficulty in directing STS how to find the new JDK. The following is the "new Java project" wizard.


But the problem is, where is the JRE_HOME directory? Over the past two decades, where MacOS puts the JDK has evolved.  Then I discovered that Java on MacOS installs with a command to find it!


The java_home command also takes a "-v" argument to specify what version of Java you seek.


Using this command tells you what directory your JDK is and you are off and coding!


By the way: learn more about TDD, micro testing, macro testing

Check out the Agile Thoughts podcast.  This podcast gets the Confessions Of An Agile Coach's endorsement (naturally, since the same people produce it) of quality materials for developers and teams trying to get coding done in a way that avoids dealing with legacy issues such as bugs and hard to maintain code.  Agile Thoughts has a lot of great TDD conceptual content along with a radio drama about the difficulties to getting a TDD initiative started.  Click the podcast cover below or here for more information.

Agile Thoughts podcast

References:


Thursday, October 3, 2019

Remote desktop via VNC from MacOS to EC2 Ubuntu 18 with XFCE

As a technical coach, I teach live online courses on various topics (TDD, ATDD, BDD, full stack Agile) and my tool of choice is EC2 instances.
This video I found pretty much tells the story and got me up and running but I wanted a document to store my learnings for future reference. Below are the steps, and I wanted to use a more enjoyable minimal window manager (Xfce) than Gnome (Gnome is pretty odd to work with for the uninitiated where Xfce is intuitive, especially for MacOS users). See the below side-by-side comparison and judge for yourself.
Note: If you find the below pictures difficult to read, selecting them will bring them into full size view.

Create and Provision your EC2 Instance

Go into AWS and create an Ubuntu 18 (or even newer). Older versions of Ubuntu are tricky to get working with a desktop manager (at least 14 had a lot of threads generated in forums of people trying to get this to work).

GUI Software Stack

These are the parts we need: VNC, a window manager, and a desktop manager.

There's another piece called a Display Manager which handles user login, but as we aren't exporting X11 directly, we don't need this.  VNC will handle our password, which means the security is reduced somewhat (the hacker only needs to get one thing correct rather than two (username & password).  But for my purpose of creating temporary dev environments, it's good enough.

So SSH into your instance and install the below:
$ssh -i path_to_your_pub_priv_key ubuntu@some_ip_address
$sudo apt install vnc4server
$sudo apt install xfce4 
$sudo apt install xfce4-terminal
What these are: vnc4server is how we'll connect from our Mac to the remote linux instance. xfce4 will bring a window manager and a set of default applications (web browser, LibreOffice,...). xfce-terminal will give us a terminal that will work with our wind-manager.

To make your ubuntu desktop happy create the following directories:
  • mkdir $HOME/Desktop  
Next, let's get VNC ready to go.  Setup the password for VNC:
$ vncserver 
Kill the server for now:
$ vncserver -kill :1
The world of VNC is a little different than the world of X11 (if you are familiar with that). A "xstartup" file is executed by the VNC server to get the windowing and desktop setup for the user who logs into the VNC. Go into $HOME/.vnc, and replace what's in xstartup with the following:
#!/bin/bash
xrdb $HOME/.Xresources
startxfce4 &
vncconfig -nowin &
These commands do the following:

  • xrdb : give X a location to store property settings.
  • startxfce4 : starts the xfce session
  • vncconfig : adds copy/paste support. I found it's solid going from VNC session to host, in my setup going from host to VNC session, I had to "slow down" and hold down the copy-paste button a bit longer or it wouldn't take.

Tidy up things by doing the following:
$chmod 755 xstartup
$touch $HOME/.Xresources 
restart VNC:
 $ vncserver 
Do "ps -eaf | grep vnc" to see what display port you will be using (it's usually ":1"):
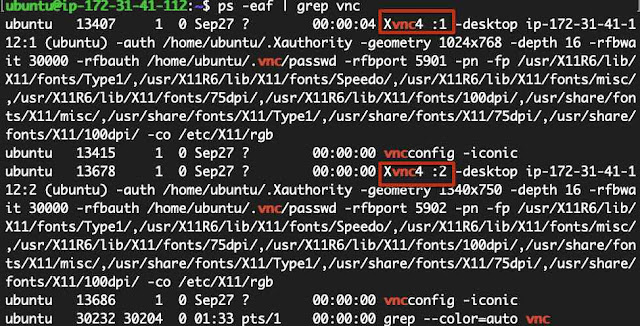
 

In the above, I've opened two display ports, ":1" and ":2".  If you ssh again and run vncserver for that session, it'll allocate get the next free display port.  More about display ports mapping to network servers will be covered later in this document but this general idea is enough to get you going.
Do a "ps -eaf | grep xfce" and you'll see that upon startup, the server executed your user's xstartup.

If you reboot the EC2 instance, your VNC server will stop. If you want VNC to always be active, you'll need to setup a "service." There is a link with instructions at the end of this article.

Connecting to your Instance

You can't yet connect directly to your instance as it's walled behind a virtual private cloud that is, by default, refusing all connections.  Two typical ways to get to your server are using SSH to create a tunnel to your server, which is great for ec2 instances you really don't want to allow connections from outside their virtual private cloud (VPC).  The other way is to change the security group so the VPC allows inbound connections so that you can frequently and conveniently connect to it with minimal fuss.
A big problem with X11 is that it doesn't communicate using a secure channel unless you use the SSH tunnel.  So bear in mind that unless you're using an SSH tunnel, all those words your passing back and forth with your X client will be traveling un-encoded.  It's not clear to me that VNC4Server makes things any more secure.

Using an SSH Tunnel

Remember the display port discovered by running "ps -eaf | grep vnc"?  If it's a one, then that maps to network port 5901.  A display port of 2 will map to network port 5902, and so on.

$  ssh -L 5902:localhost:5902 -i -path_to_your_pub_priv_key ubuntu@ip_address_here

Then launch MacOS's Screen Sharing app (go to spotlight and enter "screen sharing"), enter in "localhost:5902" which is your side of the SSH tunnel.
 You'll be prompted for your VNC password which you setup on the server when you ran "vnc4server" the first time.

Adjusting the Security Group to allow Direct Connect

If you aren't operating with sensitive information and don't want too be hassled by creating a SSH tunnel every time you want to connect to this instance, then changing the VPC security group thusly will give you access to your EC2 instance.
Refer to your instance's meta-information to get it's security group:
Then open the security group and add an inbound rule:

More about Display Ports mapping to Network Ports

VNC servers typically use the range of 5800 to 5899 or 5900 to 5999, depending on configuration. The server will use port 5800 (or 5900) for internal reasons and any new displays added will be incremented from 5800 or 5900.  VNC4 uses 5900 and so the first time I launch VNC and left it running, it got display 1 (5901). The next connection I created with my SSH tunnel (if you did that) got display 2, or port 5902.  You can see what displays/ports are being used by inspecting your system with the "ps" command.

Remember, when changing your security groups and if you plan to keep the VNC running all the time, you'll only be protected by a password, not even a username and password. You'll really be much safer from attack if you adjust the inbound rule to accept the source of only a specific IP or set of IPs rather than 0.0.0.0/0 which means from any IP address on the internet.

For Further Study

To learn more about VNC configuration: https://www.stuartellis.name/articles/vnc-on-linux/#understanding-vnc
Create a .vncrc to preset screen geometry (resolution) and .... : https://stackoverflow.com/questions/26489895/how-do-i-change-the-vncserver-default-geometry 
To make the VNC server run as a service: https://www.binarytides.com/remote-ubuntu-desktop-via-vnc/